Battery switch on travel trailer function is crucial for managing your RV’s power. Understanding how to use your battery switch – whether it’s a simple on/off switch or a more complex system – is key to enjoying worry-free camping. This guide will walk you through the different types of switches, safe operating procedures, troubleshooting tips, and best practices for maintaining your travel trailer’s electrical system.
We’ll cover everything from connecting to shore power to disconnecting your batteries for long-term storage, ensuring you’re prepared for any situation on the road.
Proper battery management is essential for a smooth and enjoyable travel trailer experience. This involves understanding how your battery switch interacts with other electrical components like your converter, inverter, and solar panels. We’ll explore how the switch position affects the functionality of various appliances and systems within your trailer, helping you avoid common problems and potential hazards. By the end, you’ll be confident in managing your trailer’s power system and extending the life of your batteries.
Understanding Battery Switches in Travel Trailers
Properly managing your travel trailer’s batteries is crucial for a successful trip. Understanding how your battery switch works is a key part of that. This section will explain the different types of battery switches and how to use them safely and effectively.
Types of Battery Switches
Travel trailers typically use one of two main types of battery switches: a simple on/off switch for each battery, or a more sophisticated switch that allows you to select between different battery combinations.
Single Battery Switches
These are the simplest type of battery switch. Each battery (typically a house battery and a starting battery) has its own individual on/off switch. This means you can turn one battery on while leaving the other off. This is useful for conserving power or isolating a faulty battery. Operation is straightforward: flip the switch to the “ON” position to connect the battery to the trailer’s electrical system, and to “OFF” to disconnect it.
Multi-Position Battery Switches
These switches offer more control over your battery system. The most common type is a 1-2-Both switch. This allows you to select:
- 1: Connects only the first battery (usually the house battery) to the trailer’s electrical system.
- 2: Connects only the second battery (usually the starting battery) to the trailer’s electrical system.
- Both: Connects both batteries in parallel to the trailer’s electrical system, providing more power.
Some switches also include an “Off” position, completely disconnecting both batteries from the trailer’s electrical system. This is crucial for preventing battery drain when the trailer is stored for extended periods.
Operating a Battery Switch
Operating a battery switch is generally straightforward, but safety is paramount.
- Identify the switch: Locate the battery switch, usually near the batteries themselves or inside a storage compartment. It will be clearly labeled.
- Understand the positions: Familiarize yourself with the switch’s positions (ON, OFF, 1, 2, Both). Consult your trailer’s manual if unsure.
- Turn off unnecessary batteries: If you’re not using the trailer, switch off all batteries to prevent drain.
- Select the appropriate position: Choose the position that suits your needs (e.g., “Both” for maximum power, “1” to run only the house appliances).
- Check your systems: After changing the switch position, verify that the appropriate systems are functioning correctly.
Comparison of Battery Switch Types
| Feature | Single Battery Switches | Multi-Position (1-2-Both) Switches |
|---|---|---|
| Complexity | Simple | More complex |
| Control | Limited | Greater control over battery usage |
| Cost | Lower | Higher |
| Maintenance | Low | Low |
Connecting and Disconnecting Batteries
Properly connecting and disconnecting your travel trailer’s batteries is crucial for safety and extending their lifespan. Understanding how shore power interacts with your batteries and establishing a consistent routine for storage will prevent issues and keep your system running smoothly.Connecting your travel trailer to shore power essentially bypasses the battery system for most functions. The 120-volt AC power from the shore power source takes over, powering appliances and lights directly.
Your batteries will still receive a trickle charge from the converter, keeping them topped up and ready for use when you’re off-grid. However, heavy use of 12-volt DC appliances like the water pump or interior lights while connected to shore power will still draw power from the batteries, even if most of your power comes from the shore.
Battery Disconnection During Storage
Disconnecting your batteries when storing your travel trailer for extended periods is vital to prevent battery drain. Even in storage, small parasitic drains from things like clocks or carbon monoxide detectors can slowly deplete your batteries, eventually leading to sulfation and irreversible damage. This is especially important during colder months, as cold temperatures accelerate the self-discharge rate of batteries.
Completely disconnecting the batteries ensures they remain fully charged and ready for your next adventure.
Maintaining Battery Connections
Proper maintenance of your battery connections is key to preventing corrosion and ensuring optimal performance. Corrosion can significantly reduce the flow of electricity, leading to reduced starting power and premature battery failure.
- Regularly inspect your battery terminals for corrosion. Look for white, powdery buildup or green, fuzzy growth.
- Clean the terminals with a wire brush or battery terminal cleaner. Ensure all connections are tight and secure.
- Apply a dielectric grease to the terminals after cleaning. This prevents future corrosion and helps maintain a good electrical connection.
- Consider using battery terminal protectors to further prevent corrosion and keep debris from accumulating on the terminals.
Safe Battery Connection and Disconnection Flowchart, Battery switch on travel trailer function
The following flowchart illustrates the proper sequence of actions for safely connecting and disconnecting your travel trailer batteries. Remember to always consult your trailer’s manual for specific instructions and safety precautions.[Imagine a flowchart here. The flowchart would start with a box labeled “Connecting Batteries,” branching to steps like “Locate battery disconnect switch,” “Turn switch to ON position,” “Verify proper connections.” It would then have a separate branch for “Disconnecting Batteries” with steps like “Turn switch to OFF position,” “Inspect terminals for corrosion,” “Clean terminals if necessary,” “Apply dielectric grease (optional).”]
Troubleshooting Common Battery Switch Issues
Your travel trailer’s battery switch is a crucial component, and problems with it can leave you stranded. Understanding common issues and how to address them is essential for maintaining power on the road. This section will guide you through identifying, diagnosing, and resolving some of the most frequent problems encountered with battery switches.
Troubleshooting battery switch problems often involves a combination of visual inspection and testing. It’s important to systematically check each part of the system, from the switch itself to the wiring and connections, to pinpoint the source of the issue. Remember safety first – always disconnect the battery negative terminal before working on any electrical components.
Identifying Faulty Battery Switches
A malfunctioning battery switch can manifest in several ways. You might experience a complete lack of power from your house batteries, intermittent power, or even an inability to switch between battery banks. Corrosion on the terminals is a common culprit, leading to poor connections and power loss. A visibly damaged switch, with broken parts or signs of overheating, also indicates a problem.
These symptoms should be distinguished from issues like a dead battery, blown fuse, or a problem within the trailer’s wiring itself. For instance, if your lights work but your appliances don’t, the problem might lie within the appliance circuit rather than the battery switch. Conversely, if
nothing* works, the switch is a prime suspect.
Solutions for Battery Switch Problems
Simple solutions often involve cleaning corroded terminals. A wire brush, baking soda paste, and water can effectively remove corrosion. Tightening loose connections is equally important. If the switch itself is faulty, replacement is necessary. This is a relatively straightforward task for those comfortable with basic electrical work, but if you’re unsure, it’s best to seek professional help.
A qualified RV technician can diagnose the problem accurately and perform the repair safely. Attempting complex repairs without the necessary expertise can lead to further damage or even injury.
Tools for Battery Switch Maintenance
Basic tools for battery switch maintenance and troubleshooting include:
Having the right tools on hand makes troubleshooting and maintenance much easier and safer. It’s always a good idea to have these items readily available in your RV’s toolkit.
- Wire brush
- Baking soda
- Water
- Screwdrivers (Phillips and flathead)
- Wrench (appropriate size for battery terminals)
- Multimeter (to test voltage and continuity)
- Safety glasses
- Gloves
Battery Switch and Electrical System Integration
Your travel trailer’s battery switch isn’t just a simple on/off switch; it’s a crucial component that manages the flow of power between your batteries and the various electrical systems in your RV. Understanding how it interacts with other parts like the converter, inverter, and solar panels is key to safe and efficient RV operation. This section will detail how the battery switch position affects your trailer’s electrical systems and appliances.The battery switch acts as the central control point for your trailer’s DC power.
It dictates which battery (or batteries) supply power to the trailer’s 12-volt system. This system powers lights, water pumps, and other DC appliances. The position of the switch directly impacts the functionality of these appliances, and an incorrect setting can lead to malfunctions or even damage. It also interacts with the AC side of your electrical system, albeit indirectly.
Battery Switch Positions and Electrical Flow
The typical battery switch has several positions: OFF, 1, 2, and BOTH. ‘OFF’ completely disconnects the batteries from the trailer’s electrical system, preventing any power drain. ‘1’ connects only battery 1 to the system, ‘2’ connects only battery 2, and ‘BOTH’ connects both batteries in parallel, providing the maximum power output. The impact of each position is significant.
For example, with the switch in the ‘OFF’ position, nothing will work, while ‘BOTH’ provides the most power, ideal for running multiple appliances simultaneously. If only one battery is connected (‘1’ or ‘2’), you’ll have limited power and may experience issues running energy-intensive devices.
Impact on Appliances and Systems
The battery switch’s position directly affects the operation of your appliances. In the ‘OFF’ position, all 12-volt appliances are inoperable. In the ‘1’ or ‘2’ position, only the appliances connected to the active battery will function. The ‘BOTH’ position provides power to all appliances, provided the batteries have sufficient charge. High-draw appliances like air conditioners or microwaves might struggle on a single battery, but should function well when both are connected.
The converter, which changes AC power to DC power, will draw from the selected battery(ies) to charge the trailer’s 12-volt battery bank. Similarly, a solar panel system will charge the selected battery(ies). The inverter, which changes DC power to AC power, will also draw from the selected battery(ies) to power AC appliances. If the switch is in the ‘OFF’ position, the solar panels will likely still charge the batteries (depending on the system design), but the power won’t be available to the trailer’s system.
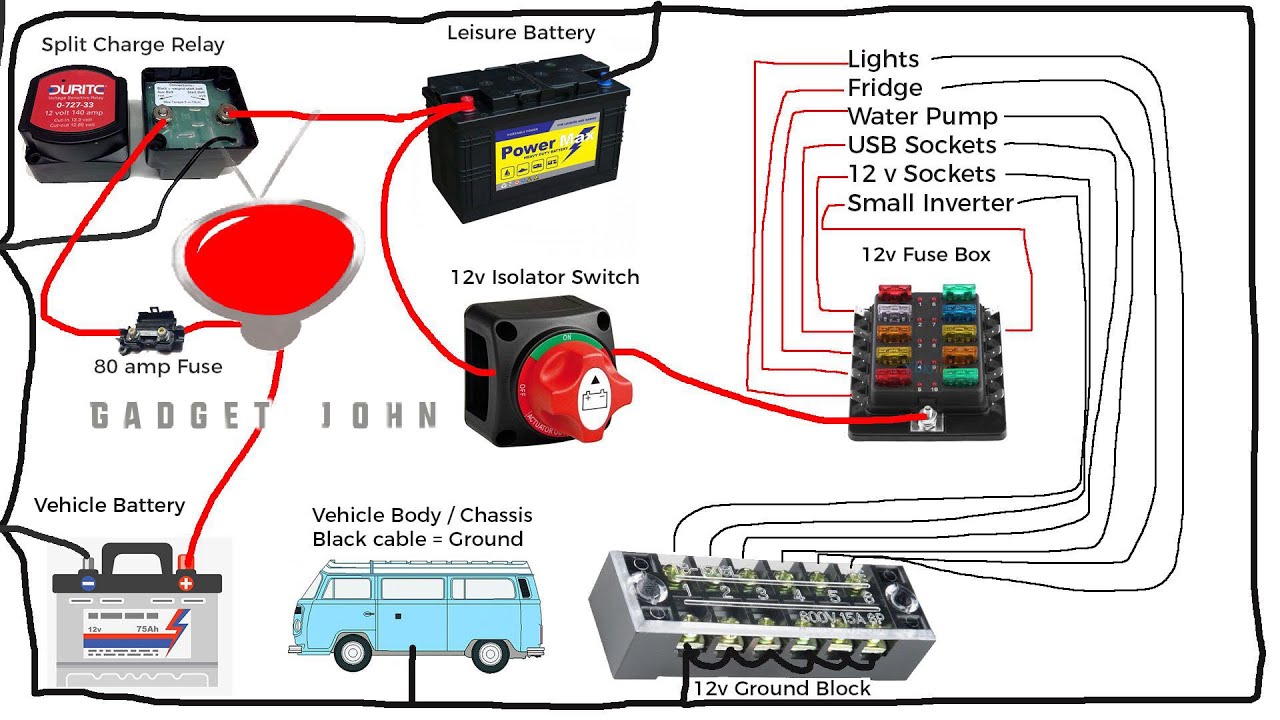
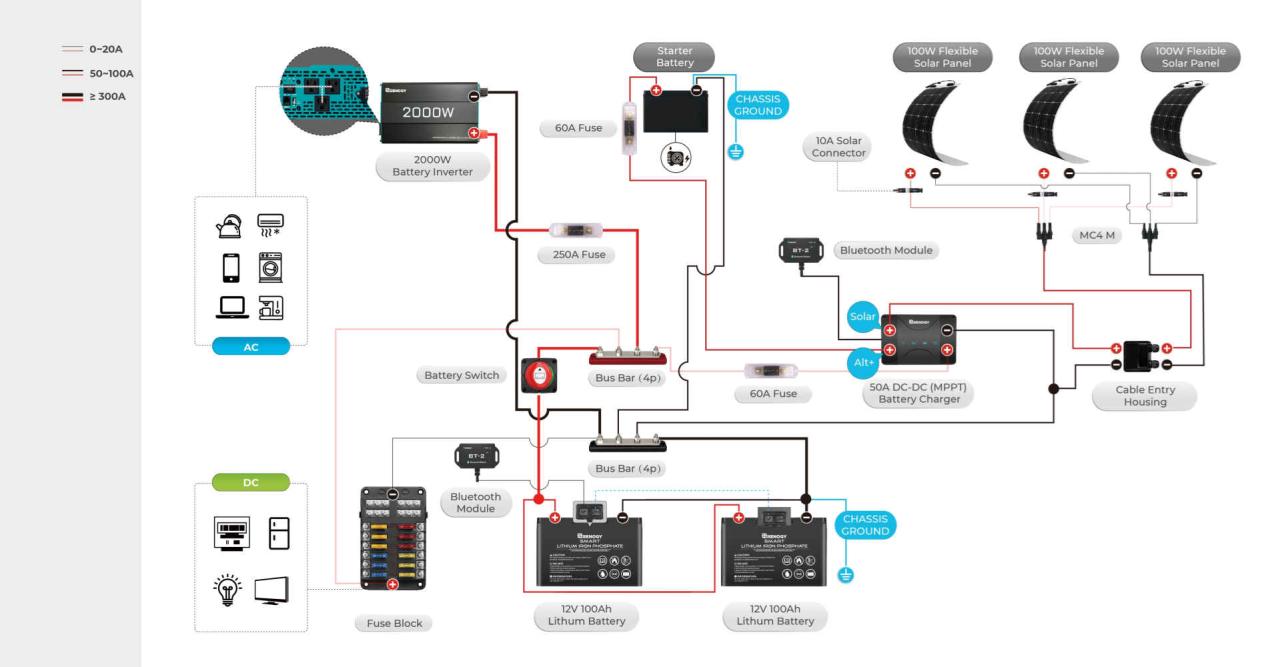
Electrical Pathway Diagram
Imagine a simple diagram: Two batteries (Battery 1 and Battery 2) are connected to the battery switch. From the switch, several wires lead to different parts of the trailer. One wire goes to the 12-volt DC distribution panel, powering lights and pumps. Another wire goes to the converter, which converts AC power from the shore power or generator to DC power to charge the batteries.
So, you’re gearing up for a road trip? Awesome! First things first: make sure you understand the battery switch on travel trailer function – it’s crucial for keeping your lights and appliances running. Once that’s sorted, let’s talk tunes! If you’re an audiophile, check out this guide on creating an amazing audiophile travel aetup for the ultimate listening experience on the open road.
Proper power management and killer sound? That’s the recipe for a perfect trip.
A third wire leads to the inverter, which changes the DC power from the batteries to AC power for appliances requiring AC. Finally, a wire connects to the solar charge controller, which regulates the power from the solar panels to the batteries. The battery switch acts as the gatekeeper, controlling the flow of power along these pathways depending on its position (OFF, 1, 2, or BOTH).
When the switch is in the ‘BOTH’ position, the power from both batteries flows through the switch to all these components. In ‘1’ or ‘2’ positions, only one battery feeds the system. In the ‘OFF’ position, the flow is completely blocked.
Safety Precautions and Best Practices: Battery Switch On Travel Trailer Function
Working with batteries and electrical systems in your travel trailer requires careful attention to safety. Ignoring basic precautions can lead to serious injury, damage to your equipment, or even fire. This section Artikels crucial safety measures to protect yourself and your RV.
Always prioritize safety when dealing with your travel trailer’s battery system. A seemingly minor oversight can have significant consequences. Remember that even seemingly “dead” batteries can retain a dangerous charge. Proper procedures are essential to prevent accidents.
Personal Protective Equipment
Before starting any work on your battery system, it’s crucial to don appropriate personal protective equipment (PPE). This includes safety glasses or goggles to protect your eyes from splashes of battery acid, which is highly corrosive. Gloves made of a suitable material, such as rubber or nitrile, are also essential to prevent skin contact with acid. Consider wearing long sleeves and pants to further protect your skin.
So, you’re prepping for your next adventure? Awesome! First things first: make sure your travel trailer’s power is sorted. Understanding the battery switch on travel trailer function is key to avoiding dead batteries and a frustrating trip. Once that’s handled, you can focus on the fun stuff, like setting up your killer sound system.
Check out this guide on audiophile travel aetup for tips on bringing your favorite tunes on the road. Happy travels!
Proper ventilation is also critical to avoid inhaling potentially harmful fumes released by batteries. Work in a well-ventilated area, or use a respirator if necessary.
Preventing Accidental Disconnections and Short Circuits
Accidental disconnections can interrupt power, while short circuits can cause sparks, overheating, and even fires. Always ensure that battery terminals are clean and free from corrosion before connecting or disconnecting them. Use a wire brush or terminal cleaner to remove any build-up. When disconnecting wires, always disconnect the negative (-) terminal first and reconnect it last. This helps prevent accidental short circuits.
Avoid loose connections, as they can create resistance and generate heat. Tighten all connections securely using the appropriate tools. When storing batteries, use battery isolators to prevent accidental shorts.
Risks of Improper Battery Switch Usage
Using the battery switch incorrectly can lead to a variety of problems. For example, accidentally switching on the house batteries while the engine is running can overload the charging system, potentially damaging the alternator or other components. Conversely, leaving the switch in the wrong position can drain your batteries unexpectedly, leaving you without power. Incorrect wiring can lead to short circuits and fire hazards.
Furthermore, improper use can void any warranties associated with the battery switch or related components.
Safety Measures to Avoid Electrical Shocks or Injuries
Working with electrical systems always carries a risk of electric shock. To minimize this risk, always disconnect the negative (-) battery terminal before performing any maintenance or repairs. Never work on the electrical system when it’s raining or the ground is wet, as this increases the risk of electric shock. If you are unsure about any aspect of the process, consult a qualified RV technician.
Familiarize yourself with your RV’s electrical system diagrams before attempting any repairs or modifications. Always double-check your connections before turning on any power. If you experience any tingling sensation while working with electrical components, immediately disconnect yourself from the system and seek assistance.
Types of Batteries Used in Travel Trailers
Choosing the right battery for your travel trailer is crucial for reliable power. Different battery types offer varying performance characteristics, impacting your camping experience. Understanding these differences will help you make an informed decision based on your needs and budget.
Two primary battery types dominate the travel trailer market: lead-acid and lithium-ion. Each has its strengths and weaknesses, affecting factors like lifespan, charging needs, and overall cost.
Lead-Acid Batteries
Lead-acid batteries are the traditional choice for many RVs and travel trailers due to their relatively low cost. They come in flooded, gel cell, and AGM (Absorbent Glass Mat) varieties. Flooded lead-acid batteries require regular maintenance, including checking and adding distilled water. Gel cell and AGM batteries are sealed and maintenance-free, making them more convenient. However, they generally have a shorter lifespan and lower energy density compared to lithium-ion batteries.
Lead-acid batteries are also more susceptible to damage from deep discharging and require careful charging to prevent sulfation, a condition that reduces battery capacity. Their weight is also a significant factor to consider.
Lithium-Ion Batteries
Lithium-ion batteries represent a significant advancement in RV battery technology. They offer higher energy density, meaning they can store more power in a smaller and lighter package. This translates to longer run times for your appliances and less weight to haul. Lithium-ion batteries also boast a longer lifespan and are less susceptible to damage from deep discharging. However, they are considerably more expensive than lead-acid batteries.
They also require specific chargers designed for lithium-ion chemistry to prevent damage. Incorrect charging can significantly shorten their lifespan.
Comparing Battery Types
The table below summarizes the key features of lead-acid and lithium-ion batteries for travel trailers.
| Feature | Flooded Lead-Acid | AGM Lead-Acid | Lithium-Ion |
|---|---|---|---|
| Cost | Low | Medium | High |
| Lifespan | 3-5 years | 5-7 years | 8-10+ years |
| Maintenance | High (requires water topping) | Low (sealed) | Very Low (sealed) |
| Weight | High | Medium | Low |
| Energy Density | Low | Medium | High |
| Charging Requirements | Requires specific charging profiles to avoid sulfation | Requires specific charging profiles to avoid sulfation | Requires specific lithium-ion compatible chargers |
Battery Switch Considerations
The type of battery switch you use will influence how you manage and protect your batteries. Simple switches offer basic on/off functionality, while more advanced switches allow for more sophisticated charging and isolation. Lithium-ion batteries often require more advanced charging systems and may not be compatible with all battery switches. It is crucial to select a switch compatible with your battery type and charging system to prevent damage or safety hazards.
Always consult the manufacturer’s specifications for both your battery and your battery switch to ensure compatibility.
Mastering your travel trailer’s battery switch is more than just flipping a switch; it’s about understanding your RV’s electrical system and ensuring safe and efficient power management. By following the safety precautions and best practices Artikeld in this guide, you can prevent common issues, extend the life of your batteries, and enjoy worry-free adventures on the open road. Remember, regular maintenance and a clear understanding of your system are key to a successful and enjoyable RV experience.
Frequently Asked Questions
What happens if I leave my battery switch in the “Both” position while driving?
Leaving the switch in “Both” while driving can potentially drain your batteries faster, especially if you’re not using shore power. It’s generally recommended to switch to either battery 1 or battery 2, or to the “Off” position if you’re not using the trailer’s power system while driving.
How often should I check my battery connections for corrosion?
Inspect your battery connections at least every three months, or more frequently if you’re in a humid climate or experience heavy use. Corrosion can significantly reduce battery performance and even lead to safety hazards.
Can I use a different type of battery than what came with my travel trailer?
You might be able to, but it’s crucial to ensure compatibility with your existing charging system and battery switch. Consult your owner’s manual or a qualified RV technician before making any changes.
My battery switch is stuck. What should I do?
Try lubricating the switch mechanism with a suitable lubricant (like WD-40). If it remains stuck, it might require professional attention to avoid causing further damage.
